Finish Up
Your book should now look like a book. The last remaining step is to cover the unsightly interior of the front and back cover. In addition to finishing off the book and making it look more attractive, pasting endsheets also increases the strength of your book, because it acts as a final reinforcement to draw the cover to the spine. If you were making a blank book, using the first and last pages of the book as your endsheets (and perhaps then covering them with a nice decorative paper to finish them off) would add the most additional strength, since those pages are actually stitched and glued to the spine.
But since your first and last pages actually contain content (including the important TOC on the first page), you’ll want to use paper specific to this task. I decided to use MAKE‘s original wraparound cover as my endsheet for the front cover board. Its thick stock works well for extra support and looks quite nice. I simply trimmed it to fit (leaving a the same distance to the each edge of the book and pasted the back of the wraparound cover to the front cover board. Allow glue to run into the spine of the wraparound cover, because you’ll want to use that area to cover the point where the cover meets the spine and extend into the front page by about 1/4″. This grips the endsheet to the book block to add reinforcement to the spine.


You’ll need to cover the back cover board in the same way. Since I’d already stripped the cover from MAKE: Volume 2 (my next bookbinding project), I went ahead and used that for my back cover (guess I’ll need to be more creative with picking my endsheets when I bind Volume 2), trimming off the unwanted back cover ad, but leaving enough room to allow the 1/4″ spine area to cover the gutter and connect the endsheet to the final page.

Put fresh pieces of wax paper between the covers and the book block, and set under heavy weights to dry overnight. You’ll wake up to a copy of MAKE that will last forever, as well as look unique and serve you well.

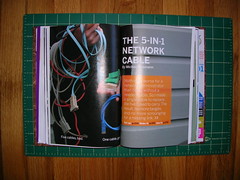
As you can see, as promised, the finished book lies flat, perfect for following an article’s instructions while working on a project like this one.
Now, on to Volume 2 …

Navigation:

wendy 1:24 pm on November 29, 2006 Permalink | Log in to Reply
this is very helpful, thank you
jenny 9:59 pm on February 22, 2007 Permalink | Log in to Reply
I’m graduating from college soon, and there’s a book at the library that I love. It’s out of print, though. I found a copy online but it was really expensive, so I photocopied every single page in the book and bound it together for less than half of the cost. Maybe I’ll buy a real copy eventually, but this one will certainly suffice.
In other words, thank you for helping me steal a book.
Brian Sawyer 9:07 am on February 23, 2007 Permalink | Log in to Reply
Nice work, Jenny. I won’t tell anyone if you won’t. It’s hard to find fault when you put so much care and attention into your “free” book.
sheralyn 2:25 pm on October 25, 2007 Permalink | Log in to Reply
I also have to thank you very much. I love to scrapbook and went to a party that sold a site who allowed you to build your pages online and then order them as a book, very expensive. I was hoping to learn how to do this myself so that my pages would last longer then the traditional style of hole punch binders and sheet protectors. I can’t wait to get started!
Kristin 10:37 am on January 31, 2008 Permalink | Log in to Reply
Dear Brian,
Thank you so much for your tutorial! I’ve been wanting to learn how to bind books for a while, but courses are quite expensive.
I’m not quite sure where to get the materials yet – I live in rural Scotland and there aren’t many craftshops – but I’m sure I can find it online.
I can’t wait to try it out – self-bound books make excellent Christmas / birthday presents. And I need to rescue my poor old paperbacks before they fall apart alltogether!
Ubiratan 8:02 pm on July 23, 2008 Permalink | Log in to Reply
Perrrrrrrrrrrrrrrfect article! I just bound a book myself the my first time. Gracias Chacramento Tói Porco Dio!!!
bloggityblogs 12:05 am on August 23, 2008 Permalink | Log in to Reply
it’s very informative, thanks. I appreciate the pictures. I am a visual learner, I learned a lot of techniques in the last ten minutes of scanning through the steps than reading blocks and blocks of words from some archaic looking websites (I imagine some frail seasoned fella slowly clicking the keys with one finger at a dark basement corner of an old library).
*yawn
hope you don’t mind my adding you to my blogroll
Kristen 3:46 pm on September 27, 2008 Permalink | Log in to Reply
Thank you for this tutorial. My mother has had a hard time, and my sister and I are trying to make a poem/art book for her. We could not find a way to bind a book that would be relatively cheap. I went online and lo and behold I found this!
So thank you so much for sharing your knowledge it certainly helps more than you’ll probably ever know.
So thanks again, and I do hope life brings you happiness for what you have done for others.
Anonymous 4:59 pm on April 7, 2010 Permalink | Log in to Reply
If I’d like a paperback, instead of the hardback, what do you suggest for the cover?
Great tutorial
Sorry for the bad English